Lip blushing effectively provides a clear, expressive contour, enhances or alters the natural lip colour, and eliminates the need for daily lipstick application, ensuring a consistently impeccable appearance. However, when offering lip tattoo services, it is crucial to consider these key aspects:
Lip Enhancement

Lip skin VS Face skin
Some clients desire to have fuller-looking lips with the help of lip blushing. Don't go more than 1mm outside of the vermilion border. It's better to suggest fillers instead of a lip tattoo if the client wants a completely different lip shape.

Lip blushing beyond the border
Fixing Uneven Lips
Another common request is to correct lip asymmetry or disproportion of the lips. It is recommended to consider each case individually, but always remembering the rule not to go beyond the vermilion border.
If the asymmetry is not pronounced, or if the lips have a blurred outline, you can try to correct these imperfections by working with a natural, non-bright palette of pigments. It's also possible to correct a shape where the upper or lower lip is disproportionate to the other.

Tattooing alone cannot correct such asymmetries
Changing Lip Shape
Many clients are often dissatisfied with the shape of their lips, be it due to drooping corners, a smudged Cupid's bow, or small lips that don't proportionately fit their facial features. These issues can be addressed with a properly selected sketch that does not replicate the old shape. Aim to enhance the Cupid's bow, avoid repeating the downturned corners of the mouth, and strive to propose a design that minimizes these flaws.
Choosing Lip Blushing Techniques
Aquarelle Lips
Suitable for a natural, subtle look. Uses light pigments close to the client's natural lip color, ideal for well-shaped lips.

Aquarelle Lips
Contour with Shading
Best for a more defined contour while still looking natural. Utilizes muted tones, perfect for ageing or less distinct lips.

Contour with Shading
Lipstick effect
Clients who are used to daily makeup and prefer bright tones will appreciate the density of this technique. To choose the right colour without getting overwhelmed by the variety of pigments, you can ask the client to bring their favorite lipstick to the procedure. The color of this lipstick can easily serve as a starting point for selecting the right pigment.

Lipstick effect
How to Prepare For A Lip Blush Procedure
Before proceeding with lip tattooing, it is essential to thoroughly understand the client's expectations and preferences.
Key aspects to discuss include:
- Understand Client Needs: Discuss the client's goals for the lip tattoo, their makeup preferences, and any lip-related issues like asymmetry or pigmentation.
- Health Checks:
- Confirm the absence of active cold-sore outbreaks. Postpone tattooing lips for a month after cold sores have fully healed to avoid complications.
- Clients with a cold-sore history should use antiviral medication before and after the procedure.
- Other Considerations:
- Avoid tattooing on lips with braces, as they can affect the shape.
- Postpone tattooing for at least three weeks following Botox or hyaluronic acid injections in the lips.
Inform clients about these points to ensure a safe and effective lip blushing process.
Pre-drawing a lip shape
 Mapping tools for PMU
Tools you’ll need:
- Red Lip Pro Peel-Off pencil
- White Pro Peel-Off pencil
- White mapping paste
- Angled Brush
- White mapping string
- Micellar water/ Green Soap
- Alcohol lotion or skin antiseptic
- Cotton pads
- Cotton swabs
- Mirror
- Sharpener
- Caliper
Steps for Pre-Drawing a Lip Shape
Step 1: Have the client sit on a chair at your level.
Step 2: Ensure the client's back is straight and her head is upright without tilting. Adjust her head as needed, using the outer corners of the eyes as a guide.

Step 3: Remove any lipstick or gloss from the lips.
Step 4: Discuss the client's preferences.Step 5: The most challenging part is convincing the client to stop smiling and laughing!
Step 6: Have a laugh with the client, and then get to work! When drafting the lip sketch, it's better to use straight lines that are easy to measure and mirror.
Step 7: Start by identifying the highest points in the Cupid's bow (points A and B) and marking them using a Red Pro Peel-Off pencil.

Points A and B
Step 8: Place a point between them in the dip.
 A point between A and B
Step 9: On the lower lip, place parallel points along a line (A1 and B1).
 Points A1 and B1
Step 10: Connect points AA1 and BB1. This will form a square or rectangle.
 Connect AA1 and BB1
Step 11: Then, mark points C and C1 at the corners of the mouth. They should be parallel to each other.
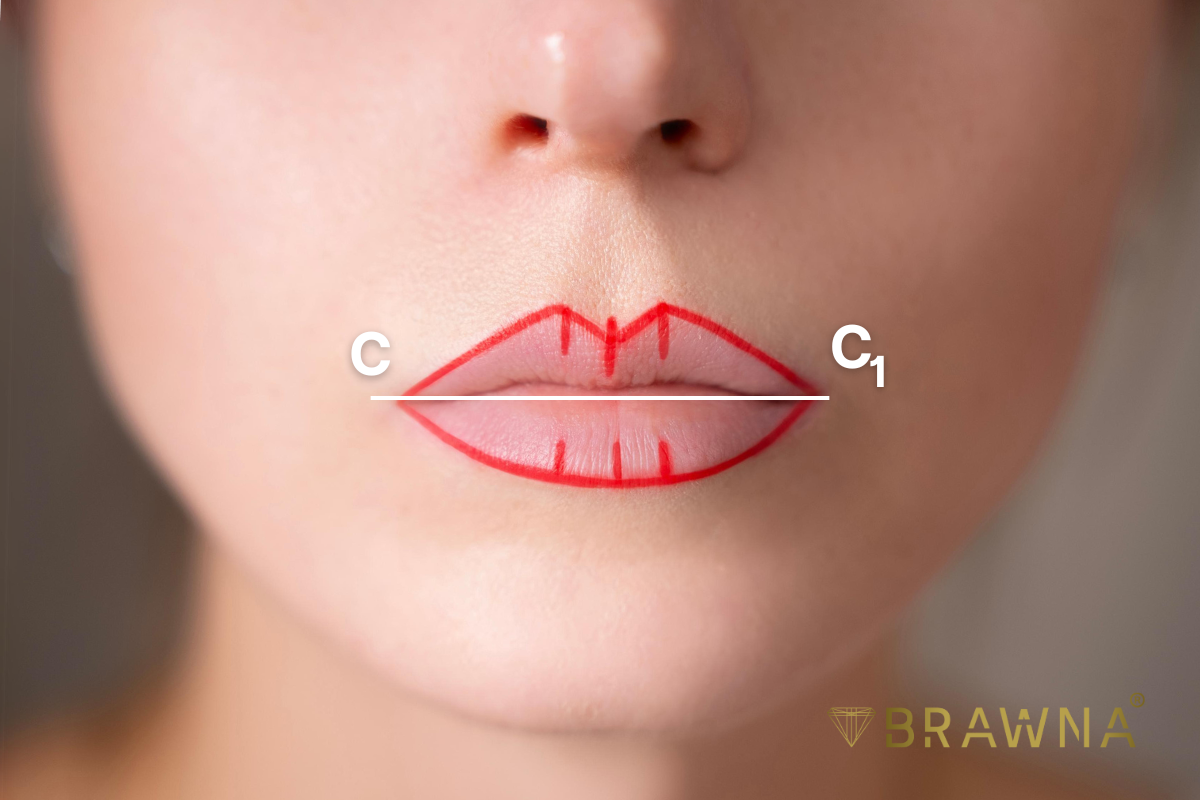 Points C and C1
Step 12: Connect the points with straight lines.
 Connect the points
TIP: To remove any unnecessary or excess strokes, use a damp cotton swab. This allows for very precise adjustments.
 Use a damp cotton swab
Step 13: Next, round off the lines where needed: in the Cupid's bow and around the lower lip's radius. Be sure to shade the entire lip area so the client can better assess the shape.
 Shade the entire lip area
TIP:
- In cases of asymmetry in the corners, try to correct it.
- Avoid repeating drooping corners.
- Do not extend lines beyond the lip margin, and ensure the lines at the corners of the mouth converge neatly.
- Check the symmetry and mirror image of these lines using a thread or tissue.
First Rule: To check for symmetry, ask the client to smile without showing teeth; this will help you evaluate the positioning of points A and B in the Cupid's bow.
 Ask the client to smile
Second Rule: If the client puckers her lips, you can better see the direction of the lines at the mouth corners and whether they converge.
 Ask the client to pucker the lips
Finalizing the Shape
Step 14: After the sketch is approved, use a White Brow Pro Peel-Off pencil to mark control points or fully outline the shape to avoid losing the sketch during work.
 Fully outline the shape
Step 15: It's also advisable to powder the lips to prevent smudging the shape on the first pass.
Step 16: Explain to the client the procedure steps, the healing process, and the care rules for the lip tattoo.
Step 17: Enjoy the result!
Proceed with the lip blushing, keeping the established sketch and client’s expectations in mind.